
Perfect Fermentation Temperature Control With Multiple Fermenters At Varying Temperatures
How to economically manage multiple fermentation temperatures in the same room.

I’ve been asked many times in the past how to control the temperature of your all in one brewing system fermenter when the tap water exceeds the desired fermentation temperature. I’ve seen lots of expensive equipment implemented, and I thought that there has to be a better way. The most common are fermentation fridges, and brewers would either lug a carboy into a deep freezer set to a thermostat or buy a fermenter small enough to fit into a refrigerator. Both of these methods work, but let’s be honest, they're a pain in the ass. What if you want to ferment a lager and a porter at the same time? That means that you’ll need two refrigerators, right? Not necessarily.
I struggled with this problem myself, using tap water to ferment my brew and I’ve been using tap water controlled by a solenoid to regulate the fermentation temperatures in my conical fermenters. While it works fine, I want to get away from wasting so much water.
The solution I came up with started with a compressor driven aquarium water chiller. This method of cooling is for my money, the most efficient method of cooling multiple conical fermenters. I'm using a 1/4 HP water chiller, and it is almost too powerful even when I have three 75L fermenters hooked up to it! Also, the power consumption is minimal as it is cycling on and off, with prolonged off times meaning the only power that is being consumed is the draw of the recirculation pump.
Water chillers chill water but need to have the liquid pushed through them, so I use an aquarium magnetic drive pump for that. It can chill up to three fermenters at different temperatures at the same time, using just this single pump all in one brewing system, a small aquarium chiller and a custom made pair of manifolds to add or remove fermenters as you wish. This setup has room for expansion and would be a perfect solution to chill multiple fermenters in a micro or nano brewery, sized appropriately. If you want to chill a single fermenter or multiple fermenters, this tutorial should give you a good starting point. Now, your cooling requirements will differ based on these factors; the ambient room temperature, the GPM flow of the water pump through the chiller, the size of the fermenter and the number of fermenters you are planning on adding to the closed loop.
If you are running a bigger setup than what I’m using for this tutorial, you’ll need to properly size up your cooling needs so that you purchase an appropriately sized fermenter. Here’s how you do it.
- Calculate the “delta T,” which is the change in temperature between the inlet water through your fermenter(s). You’ll need to place a temperature probe inline to measure accurately. Check the water temperature of the inlet water and the outlet, and subtract the difference for each fermenter. Now, you will add these numbers up to calculate the total difference in temperature.
- Calculate the flow of the water pump in your all in one brewing system. Rated flow will be different than actual flow because of line restrictions, so it’s best to measure using a flow meter or fill up a 5-gallon bucket at the return end of your fermenter.
- Now that you have these two numbers, calculate how many BTU’s (British Thermal Units) that your fermenters combined put out.
BTU/hour= 500 x GPM X Temperature Difference or “delta T”.
For larger cooling applications, this would be how you would choose the appropriate water chiller for your needs. I’ll give you an example:
Disclaimer: I have no idea how much heat a 3BBL fermenter will put out. Please don’t use the example calculation below as gospel; you will have to measure your cooling requirements yourself to accurately size a water chiller for your brewery’s needs.
You have three 3BBL fermenters and a 1500 GPH pump driving liquid through. You’ve measured the return of the liquid at 1200GPH. This gives you 20 GPM.
The measured temperature difference of a single fermenter in the room you are fermenting in is 1 degrees at the return from the inlet. Because you have three fermenters, this would give you a total temperature differential of 3 degrees Fahrenheit.
Using the calculation above: 500 x 20 x 3 = 30,000 BTU or 2.5 Tons of cooling required for your application. Makes sense?
Now back to our post. For my setup, the return temperature from the fermenter was almost impossible to measure vs. the input temperature. In this case, you could buy a 1/10th HP water chiller which is the smallest made on the market. I used stuff to make this out of what I had, plus a few trips to the local Home Depot. Feel free to adapt this general design to your own setup; there are many ways to skin a cat.
How it Works:
We designed this system to use as few parts, and to be as inexpensive as possible, yet provide predictable and accurate fermentation temperature.
Making use of a check valve, you are able to use only a single pump. Because the water chiller needs to have constantly flowing source, the water flows from the reservoir and through the chiller constantly and returns to the reservoir via the check valve in the supply manifold. The check valve is spring loaded, and as soon as a fermenter has a demand for cooling, the solenoid valve associated with that fermenter opens. The pressure reduces enough to allow water to flow through the fermenter and the check valve closes. You may find the check valve isn't sprung tight enough to close all the way when a fermenters solenoid valve opens, and this can be fixed by either tightening the screw inside the check valve or by adding a second check valve in line with the first. The water then flows out of the fermenter, and through the return manifold, into the reservoir. I like to set the temperature of the water chiller a few degrees lower than the lowest fermentation temperature. Too low, and you’ll overshoot the temperature inside your fermenter. As you can see, this makes for a far simpler, economical way to chill multiple fermenters. Please share with us your own builds; you can email us your photos here, or upload via social media and don’t forget to tag us! Also, we’ll have a video up on our youtube channel, so please check it out.
Materials Required:
QTY 1 - Water chiller, I bought mine on Amazon
QTY 1 - Roll of Teflon tape
QTY 1 - Water reservoir, I used a small insulated ice chest cooler that I bought at a camping store. It is around 5-gallons in size. The smaller the reservoir, the quicker the aquarium chiller will cycle, and you don’t want it to cycle too often as a compressed needs a minimum down time. However, if your reservoir gets too big, you won’t be able to chill the water cold enough for the size of your chiller. Most chillers have a guideline as to how much the maximum reservoir size is.
6’ of 3/4” ID tubing.
1/2” ID tubing for connecting your fermenters to the heat exchanger manifold. You’ll determine yourself how much length you need for this.
QTY 3 - 1/2” Female to Barb Quick Disconnect fittings.
QTY 3 - 1/2” barb to tri-clover adapters (depending on your setup this may change)
A bunch of stainless hose clamps
A water solenoid adapter kit (We sell these on our website; however, you can come up with your own, and adapt it accordingly. Ours has a male garden hose fitting at the end for easy connection)
QTY 3 - Washing machine connection hose. These come with female Garden Hose connections at both ends, making adding or removing a fermenter an easy task.
QTY 3 - SV1 temperrature controllers. We sell these pre-wired, in my case, I’m using the Dwyer controller, but any switching controller will work fine for this task. We could’ve used two instead of three controllers, and used an additional temperature probe, because the Dwyer is a dual stage controller, but I wanted each fermenter to display the actual temperature, without having to push any buttons.
QTY 1 - Jar of PVC cement
Pump Assembly:
QTY 1 - Water pump, I bought a 900 GPH Danner pump for this application, as they produce very little heat, and the flow of water is high enough to run through the coils of our fermenters.
QTY 1 - 3/4” FPT PVC coupling
QTY 1 - 3/4” MPT to 3/4” barb plastic adapter
Supply Water Manifold:
QTY 5 - 3/4” PVC tees
QTY 4 - 3/4” PVC 90º
QTY 4 - 3/4” PVC shut off
QTY 3 - 3/4” slip to GH male PVC adapters
QTY 1 - 3/4” slip to 3/4” MPT PVC adapter
QTY 1 - 3/4” slip to 3/4” barb PVC adapter
QTY 1 - 3//4” FPT spring operated brass check valve
QTY 1 - 3/4” MPT to 3/4” barb plastic adapter
2 feet of 3/4” PVC pipe
Return Water Manifold:
QTY 2 - 1/2” PVC 90º
QTY 2 - 1/2” PVC Tee
QTY 3 - 1/2” PVC shut off
QTY 3 - 1/2” PVC slip to 1/2” MPT adapters
QTY 3 - 1/2” FPT to male quick disconnects
2 feet of 1/2” PVC pipe
How To:
1. Assemble the parts you will need to make your supply water manifold. I like to lay things out first to get an idea of the finished product. The reason that I made a loop is to equalize the pressure in the manifold so that each fermenter receives equal water if for some reason all three of the solenoids open at once. Lay a piece of cardboard underneath your build; it gets messy. If you have some gloves, use them.

2. Cut the 3/4” PVC into the lengths needed. Tubing cutters make the job easy. Dry fit all the parts BEFORE gluing together.
3. Glue all of the PVC joints together, applying glue to both parts to be glued together. Work fast; it sets very quickly.
Here’s what it looks like as it’s setting up…

4. Lay out the parts for the return manifold. Once you have it the way you want it, cut up the 1/2” PVC tubing. You’ll need 10 lengths. 
5. Glue them up! It should look like this:

6. Now, attach the pump parts, and drill out the lid of your cooler. I used a 1” paddle bit. Use a hole saw if you want cleaner holes than my messy drillings!

7. You’re almost there. Place your pump inside the reservoir, and attach the 3/4” tubing to your pump, and to the inlet of the supply water manifold. The tubing will go through the lid of your reservoir. Attach another length from the outlet of the check valve, run it into the reservoir through the second hole of the lid. Now, place the long end of the return manifold through the last hole of the reservoir lid.


8. Finally, you’ll hook up your fermenters to the supply and return manifolds using the solenoid kit, and your tri-clamp barb fittings. The solenoid regulates the incoming water to the fermenter and is connected to the supply manifold using the washing machine hoses. The return from the fermenter is attached to the manifold using a length of the 1/2” tubing, the female quick disconnects at one end, and the tri-clamp fittings at the other.

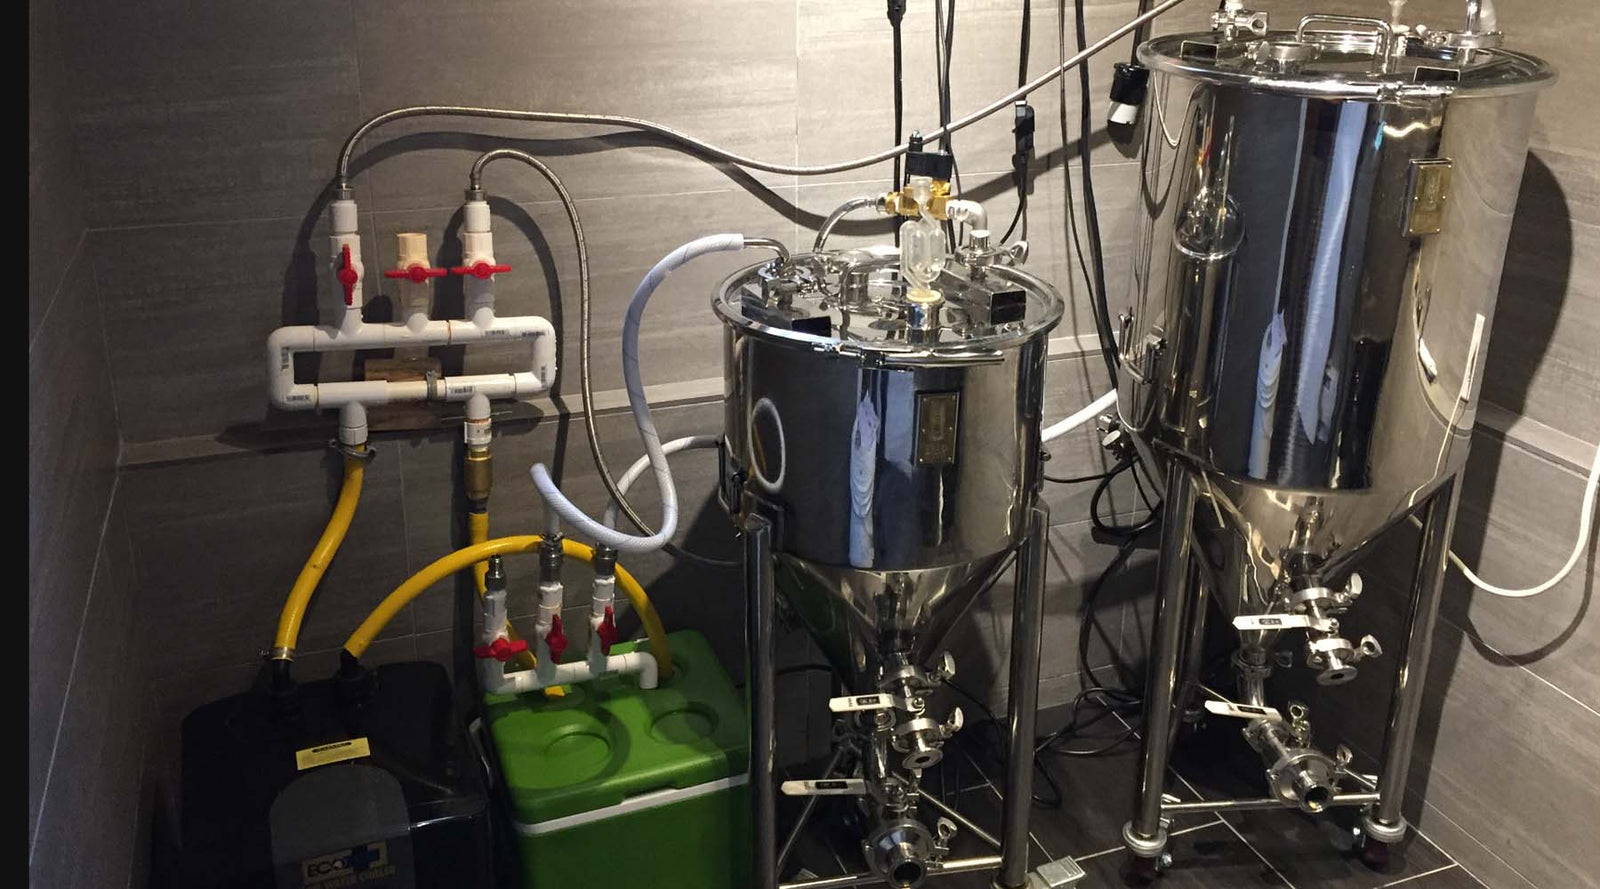
9. Now, all you need to do is mount your ETC controllers to the wall, plug the probes into your thermowell, and plug the solenoids into the ETC controller. Here’s a shot of what it looks like in action!

More articles how to brew beer
The ultimate guide to Kveik yeast: Unleashing it's fermentation potential
Revolutionizing home brewing: The simplified art of no sparge brewing
Exploring amber ales: A guide with a twist on the traditional recipe
Mastering cold crashing: Enhancing beer clarity and accelerating the aging process
What is the basic function of the fermenter?
What causes a fermenter to heat up?
The art of lagering: A guide to perfecting the cold conditioning process
Troubleshooting fermentation problems in brewing: A comprehensive guide